SBSS Pre-Entry Assessment
Overview
The Small Boat Sailing Scheme (SBSS) Pre-Entry assessment is the first step in becoming a qualified sailing instructor. This assessment evaluates your personal sailing ability and foundational knowledge to ensure you're ready to begin instructor training.
The Pre-Entry is not a teaching course—it's an assessment of your existing skills. You should already be a confident sailor with experience in a variety of conditions before attempting this assessment.
Prerequisites
- Age: Minimum 16 years old
- Sailing Experience: You should have completed at least Basic Skills or equivalent, with significant sailing experience beyond that level
- Boat Handling: Confident handling of dinghies in moderate winds (up to Force 3-4)
- First Aid: While not mandatory for Pre-Entry, basic first aid knowledge is beneficial and will be required for full instructor certification
📚 Recommended Preparation Course
Before taking the Pre-Entry assessment, I highly recommend completing the RYA Essential Seamanship course. This course covers fundamental sailing knowledge including:
- Knots and ropework
- Safety equipment and procedures
- Navigation rules and collision regulations
- Weather understanding and forecasting
- Tides and tidal planning
This course provides excellent theoretical foundation that complements practical sailing skills. Learn more: RYA Essential Seamanship Course
Personal Preparation: Clothing & Equipment Selection
You must be able to select and explain appropriate clothing and personal equipment for the prevailing conditions:
Essential Personal Equipment:
- Buoyancy Aid: Must fit correctly and be properly fastened - worn at all times on the water
- Appropriate footwear: Non-slip sailing shoes or boots that won't damage the boat
- Wetsuit or drysuit: Choose based on water temperature (wetsuit for warmer water, drysuit for cold)
- Thermal layers: In cold conditions, wear thermal base layers under wetsuit/drysuit
- Windproof/waterproof top layer: Spray top or sailing jacket in moderate conditions
- Sun protection: Hat, sunglasses with retaining strap, and sunscreen in sunny conditions
- Gloves: Sailing gloves to protect hands from rope burn
How to Choose Appropriate Clothing:
- Check water temperature: Below 15°C requires wetsuit or drysuit
- Consider air temperature: Dress for being in the water, not just on the boat
- Wind chill factor: Wind makes it feel colder - add windproof layers
- Length of session: Longer sessions require better insulation
- Capsize likelihood: If capsizing is likely (training, high winds), dress for immersion
- Layer system: Multiple thin layers better than one thick layer - allows adjustment
📌 Key Principle:
Always dress for the water temperature, not the air temperature. If you capsize, you need to be protected from cold water shock and hypothermia.
Personal Sailing Skills
You'll be assessed on your ability to demonstrate the following skills competently and safely:
Jump to a skill area:
1. Boat Preparation
For detailed rigging guidance, see Start Sailing - Rigging
How to Rig a Dinghy:
- Prepare the boat: Check the boat is secure and won't blow away. Ensure all drain bungs are in place.
- Attach the rudder and tiller: Slide the rudder onto the pintles (hinges) at the stern. Ensure it's secure and the tiller moves freely.
- Step the mast: With help if needed, lift the mast vertically and lower the base into the mast step. Secure any forestay and shrouds to the chainplates, adjusting tension evenly.
- Attach the boom: Connect the boom to the mast using the gooseneck fitting. Attach the kicker/vang underneath.
- Rig the mainsail: Slide the luff into the mast track and the foot into the boom track. Attach the halyard to the head and hoist until tight. Secure the outhaul at the clew.
- Rig the jib (if applicable): Attach the jib halyard to the head, hanks to the forestay (or feed into luff groove), and sheets to the clew. Hoist and secure.
- Attach control lines: Thread mainsheet through blocks, attach jib sheets to fairleads, and check all lines run freely.
Safety Checks:
- Check all shackles are closed and moused (secured with tape or wire)
- Ensure all control lines are properly led and not twisted
- Test that the rudder lifts and drops smoothly
- Verify buoyancy aids and safety equipment are aboard
- Check for any damage to sails, spars, or hull
- All halyards tidied away and secured
- Drain bungs in place
Sail Tuning (Before Launching & On Water):
Proper sail tuning is critical for boat performance and control. Tune on shore before launching, then re-tune once on the water.
Outhaul (Mainsail Foot Tension)
- Purpose: Controls tension on the foot of the mainsail, affecting sail shape and power
- Tight: Flattens the sail, reduces power - use in strong wind or for pointing
- Loose: Adds depth/fullness to sail, increases power - use in light wind or for speed reaching
- Correct setting: Tension until the small wrinkles along the boom disappear, then ease slightly
- Adjustment: Can be adjusted while sailing - ease off in gusts, tighten in lulls
Kicker/Vang (Boom Downhaul)
- Purpose: Holds boom down, prevents it from lifting, controls sail shape
- Loose: Boom lifts, sail becomes full and powerful - light wind sailing
- Tight: Boom held down, sail flattened, reduces twist - strong wind or reaching
- Correct setting: Boom should be held firmly but not excessively - just enough to prevent excessive lifting
- Reaching/running: Tighten significantly to control sail shape and prevent accidental gybes
Cunningham (Luff Tension/Downhaul)
- Purpose: Tensions the luff of the mainsail, controlling horizontal sail shape and draft position
- Loose: Adds fullness to sail, increases power - light wind
- Tight: Flattens sail, moves draft forward, reduces power and improves pointing - strong wind
- Correct setting: Tighten until small wrinkles on the luff disappear, ease if wrinkles reappear
- When to use: Mainly for upwind sailing in changing wind conditions
Jib Fairlead Position
- Purpose: Controls jib sheet angle and sail shape
- Forward: Tightens lower jib, loosens top - better for upwind sailing
- Aft: Loosens lower jib, tightens top - better for reaching/running
- Correct setting upwind: Both jib and main telltales stream on both sides simultaneously
📋 Rigging Assessment Criteria:
- Safe: Boat is tidy, fit for purpose, all safety checks completed
- Tuning: Outhaul, kicker, and cunningham properly adjusted for conditions
- Sails tuned: Before launching and re-tuned on water if needed
- Notify assessor: If any problems arise during assessment
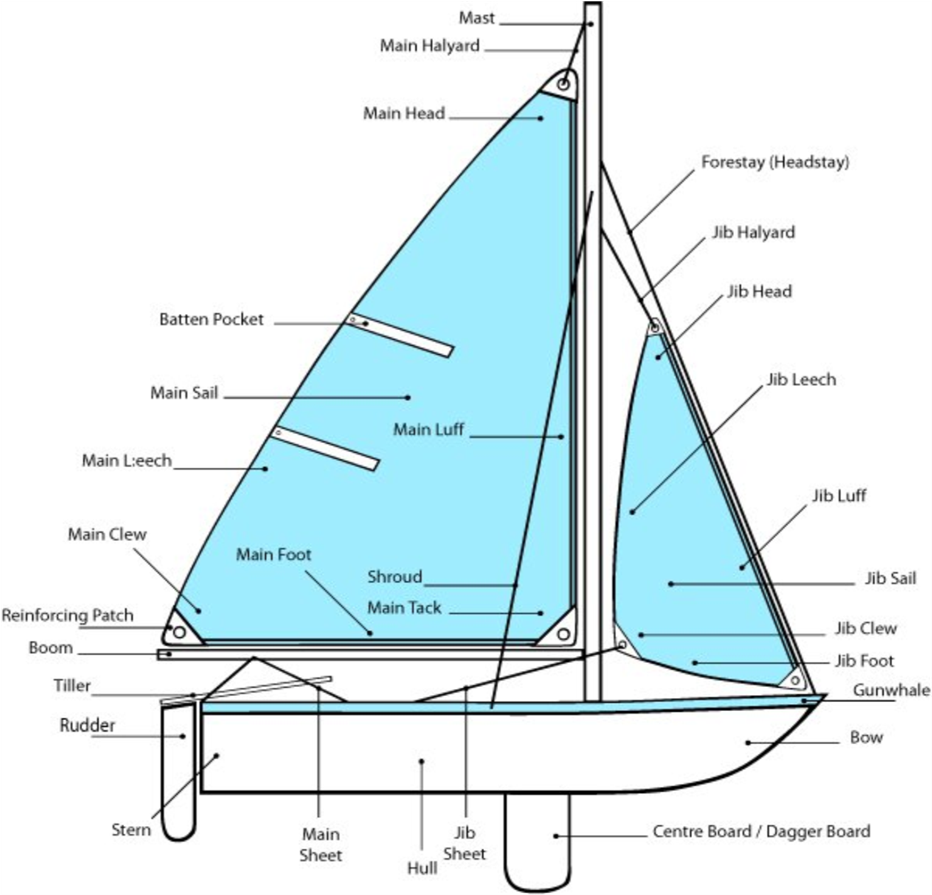
Identifying Boat Parts:
You must be able to identify and explain the function of all major boat parts:
- Hull: Main body of the boat
- Bow: Front of the boat
- Stern: Back of the boat
- Transom: Flat surface at the stern
- Gunwale (pronounced "gunnel"): Upper edge of the hull sides
- Mast: Vertical spar supporting the sails
- Boom: Horizontal spar at the bottom of the mainsail
- Rudder: Steers the boat (at stern)
- Tiller: Handle used to control the rudder
- Centreboard/Daggerboard: Prevents sideways drift
- Mainsail: Larger sail attached to mast and boom
- Jib/Foresail: Smaller front sail (if present)
- Mainsheet: Line controlling the mainsail
- Jib sheets: Lines controlling the jib (port and starboard)
- Kicking strap/Vang: Prevents boom from lifting
- Outhaul: Tensions the foot of the mainsail
- Cunningham: Tensions the luff of the mainsail
- Forestay: Wire supporting mast from front
- Shrouds: Wires supporting mast from sides
Interactive diagram - click on parts for details. See also Start Sailing - Rigging section
Essential Knots - How to Tie Them:
Figure-8 Knot (Stopper Knot)
Used to prevent rope ends from running through blocks.
- Make a loop in the rope
- Pass the working end around behind the standing part
- Thread it back through the loop
- Pull tight - should look like the number "8"
Interactive 3D demonstration. See also Start Sailing - Ropework
Bowline (Loop that won't slip)
Used to attach sheets to sails or create a fixed loop.
- Make a small loop in the standing part ("rabbit hole")
- Pass the working end up through the loop ("rabbit comes out")
- Wrap around behind the standing part ("around the tree")
- Thread back down through the loop ("back down the hole")
- Pull tight while holding the standing part
Interactive 3D demonstration. See also Basic Skills - Ropework
Round Turn & Two Half Hitches
Used to secure a boat to a post or ring.
- Pass the rope around the post twice (round turn)
- Make a half hitch around the standing part
- Make a second half hitch below the first
- Pull tight - the round turn takes the load, hitches secure it
Interactive 3D demonstration. See also Start Sailing - Ropework
Clove Hitch
Quick hitch for temporary mooring or attaching fenders.
- Make a loop around the post
- Make a second loop in the same direction, crossing over the first
- Pull tight - forms two interlocking loops
- Note: Can slip under load, so back it up for critical uses
Interactive 3D demonstration. See also Basic Skills - Ropework
Reef Knot (Square Knot)
Used to tie two ropes of equal diameter together (e.g., reefing lines).
- Cross right over left and under
- Cross left over right and under
- Pull tight - should look symmetrical ("right over left, left over right")
- Warning: Never use for critical loads - can capsize under strain
Sheet Bend
Used to join two ropes of different diameters together. Essential for extending lines or joining sheets.
- Make a bight (loop) in the end of the thicker rope
- Pass the thinner rope up through the bight from underneath
- Wrap the thinner rope around behind both parts of the bight
- Tuck the working end under itself (but not through the bight)
- Pull tight - the thinner rope should grip the thicker rope's bight
- For extra security, use a double sheet bend by wrapping twice
Interactive 3D demonstration. See also Basic Skills - Ropework
Cleat Hitch (Making Fast on a Horned Cleat)
Used to secure a line to a cleat - essential for tying off sheets, halyards, and mooring lines.
- Lead the line: Bring the line to the cleat from the correct direction (usually from the loaded side)
- First wrap: Take one complete turn around the base of the cleat
- Figure-8 pattern: Cross over the top diagonally, loop under the opposite horn
- Continue figure-8: Cross back diagonally the other way, loop under the first horn
- Locking hitch: On the final wrap, form a loop and slip it over the horn upside down to lock it
- Never cross the standing part: Keep wraps neat and ensure line can be quickly released
💡 Key Points:
- Minimum 3 wraps (1 base + 2 figure-8s) for security
- Can be cast off quickly in an emergency
- Locking hitch is good for permanent moorings but not for lines that need quick adjustment
- Never wrap line around cleat multiple times without the figure-8 pattern - it jams!
Interactive 3D demonstration showing proper cleat hitch technique
Coil and Secure a Rope
Proper rope management keeps lines tidy, prevents tangling, and allows quick deployment.
- Start coil: Hold rope in one hand, loop it around your hand in large coils
- Keep loops even: Make coils roughly the same size (about 60cm diameter)
- Avoid twists: Keep coils flat without twists - rotate wrist gently to prevent kinking
- Build the coil: Stack coils on top of each other, keeping tension consistent
- Secure the coil: When complete, use a small piece of rope (gasket) or carabiner to hold coil together
- Tie-off method: Wrap gasket around coil several times, then tuck end through final wrap
- Storage: Hang coil vertically or lay flat - never store rope in tight knots
📌 Assessment Tip: Neat coiling shows professionalism and good seamanship. Coil ropes properly at the end of each sailing day.
Assessment: Knots
Assessment Criteria for Knots:
- You have a maximum of 1 minute per knot
- Know the uses, advantages, and disadvantages of each knot
- Tie all required knots competently
- Required knots: Figure-8, Round turn & 2 half hitches, Bowline, Clove hitch, Sheet bend, Make off on horn cleat, Coil and secure rope
2. Launching & Recovery
Assessment Criteria: Launch & Recover
- Control: Stop cleanly on slip, leave with purpose and good control
- Safe: Don't jump out of boat, crowd the slip, or impact anyone's safety
- Responsibility: You are responsible for both launching AND recovering
For detailed launch and recovery techniques, see Start Sailing - Launch & Recovery
How to Launch from a Slipway/Beach:
Offshore Wind (Wind blowing away from shore):
- Prepare the boat fully rigged on shore with sails raised
- Point the boat straight out into the wind
- Crew and helm get aboard, helm in first
- Push off and immediately drop the rudder and centreboard
- Sheet in and sail away on a close reach
Key point: Speed is essential - the wind is trying to blow you back to shore!
Onshore Wind (Wind blowing toward shore):
- Rig the boat with sails lowered or loosened
- Push/carry the boat into knee-deep water, pointing bow into wind
- Helm gets in first, crew holds the bow steady
- Drop centreboard partially, insert rudder
- Crew pushes off and scrambles aboard
- Bear away onto a reach, sheet in gradually, drop centreboard fully
Key point: Start in deeper water to avoid being pushed back ashore.
↔️ Cross-Shore Wind:
- Position boat parallel to shore with bow pointing into wind
- Wade into shallow water with boat
- Crew holds bow into wind while helm boards and prepares
- Drop centreboard and rudder when in deep enough water
- Crew pushes bow off and boards quickly
- Sheet in and sail away on a reach
How to Recover the Boat:
Standard Recovery (Offshore or Cross-shore Wind):
- Approach: Come in on a close reach, aiming to stop head-to-wind in shallow water
- Final approach: Ease sheets to slow down, turning head-to-wind at the last moment
- Stop: Let sails flap freely while in shallow water (knee-deep)
- Crew action: Crew jumps out first (if safe) and steadies the boat
- Secure: Lift centreboard and rudder partially to avoid damage
- Land: Walk/float the boat to shore, remove rudder, then pull boat up slipway
🚨 Recovery to a Lee Shore (Onshore Wind - CRITICAL TECHNIQUE):
When the wind is blowing toward the shore (onshore/lee shore), a standard approach is dangerous as the wind pushes you onto the shore. Use this specialized technique:
- Drop the mainsail: While still well offshore, lower and secure the mainsail completely
- Sail on jib only: Use only the jib to approach - this gives you much better control and less power
- Approach slowly: The jib alone provides enough power to maintain steerage but much easier to control
- Control speed: Sheet in jib to move forward, ease jib to slow or stop
- Final approach: When close to shore, release jib completely to stop
- Crew exits: Crew jumps out in shallow water and holds the bow
- Secure boat: Lift centreboard and rudder, then bring boat ashore
⚠️ Why Jib Only for Lee Shore Recovery:
- Reduced power: Jib alone provides minimal power, preventing you from being blown onto shore too fast
- Better control: Easy to spill wind from jib by easing sheet - instant speed control
- Can sail head-to-wind: Jib alone allows you to point almost directly into wind, straight toward shore
- Quick stop: Simply release jib sheet and boat stops immediately
- Safety margin: If anything goes wrong, you're not being driven onto shore by a powerful mainsail
Proper landing technique. See Basic Skills - Landing section
⚠️ Safety Tips:
- Always check water depth before jumping out
- Communicate clearly with your crew throughout
- Never let go of the boat until it's secured on shore
- Watch for other boats, swimmers, and obstacles
- Lift centreboard/rudder to prevent damage on bottom
- Lee shore recovery: Always drop mainsail early and use jib only approach when wind is onshore
3. Boat Handling
See Start Sailing - Sailing Techniques for detailed explanations
How to Tack (Changing direction through the wind):
- Check clear: Look around for other boats and obstacles
- Alert crew: Call "Ready about!" and wait for "Ready!" response
- Start turn: Push tiller smoothly away from you, calling "Lee-oh!" or "Tacking!"
- Crew releases: Crew uncleats old jib sheet as boat turns through wind
- Cross boat: Both helm and crew move across as boom swings over
- Sheet in: Crew pulls in new jib sheet, helm centers tiller
- Settle on course: Fine-tune balance and sail trim on new tack
Pro tip: Keep boat speed up throughout - too slow and you'll get stuck in irons (head to wind)!
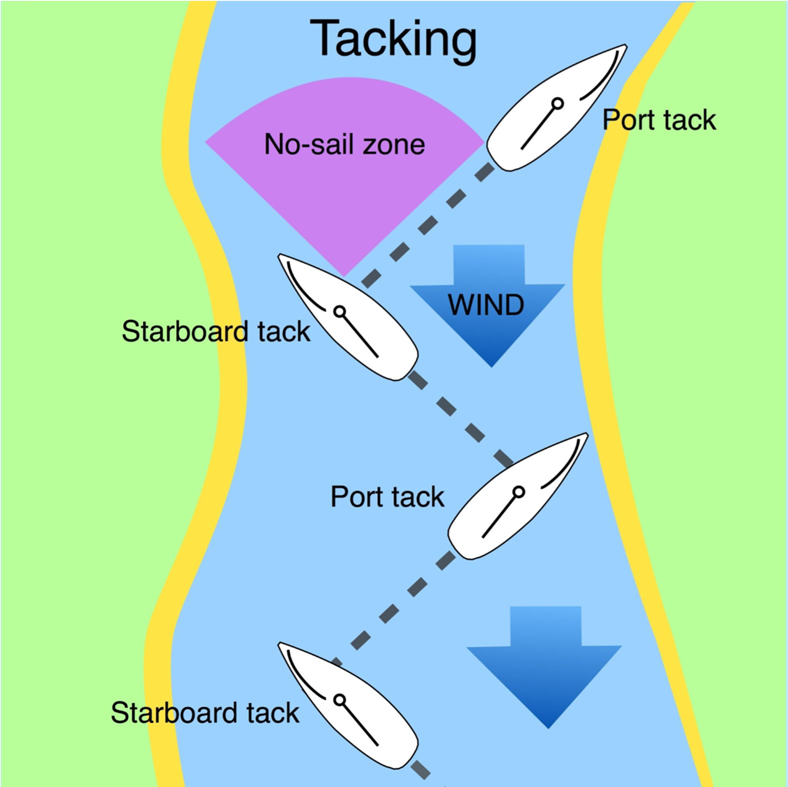
See Start Sailing - Tacking section for step-by-step guide
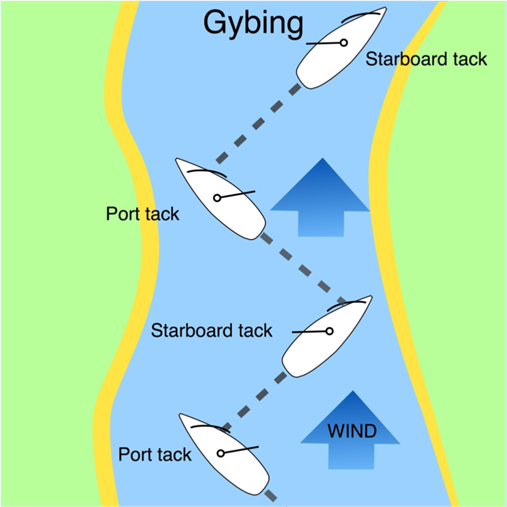
How to Gybe (Changing direction with wind behind):
- Check surroundings: Ensure clear all around - gybes happen fast!
- Alert crew: Call "Ready to gybe!" and wait for acknowledgment
- Sheet in mainsheet: Pull mainsheet in to center boom before turn
- Begin turn: Pull tiller toward you smoothly, calling "Gybe-oh!"
- Control boom: Boom swings across - keep mainsheet controlled
- Cross boat: Move across quickly, ducking under boom
- Let out sail: Release mainsheet gradually on new gybe
- Balance boat: Adjust weight to prevent rolling
⚠️ Warning: Gybes are more dangerous than tacks - the boom swings across with force. Always control the mainsheet!
See Start Sailing - Gybing section for detailed guidance
Beating (Sailing to Windward):
How to sail as close to the wind as possible while maintaining speed:
- Point high: Sail about 45° to the wind - any closer and sails will luff this varies by boat though
- Sail trim: Sheet in tight, sails nearly centerline
- Centreboard: Fully down to prevent sideways drift
- Body weight: Hike out to keep boat flat
- Watch telltales: Keep inner telltales streaming, adjust heading if they lift
- Speed vs pointing: Bear off slightly in gusts for speed, point up in lulls
See improving skills - tuning section for detailed guidance
Reaching (Sailing Across the Wind):
- Sail trim: Ease sails until just before they luff, then sheet in slightly
- Centreboard: Half to three-quarters down depending on wind angle
- Balance: Keep boat level - fastest point of sail, so control power!
- Course: Steer a straight line - wave your way for speed in light winds
Fastest sailing: Reaching is when you'll achieve maximum speed - keep the boat flat!
Running (Sailing Downwind):
- Sail position: Let sails right out, nearly 90° to centerline
- Centreboard: Raise to quarter down (reduces drag)
- Watch for gybes: Be alert - boat can gybe accidentally if you steer too far
- By the lee: Sailing with wind coming over boom side - advanced, be ready to gybe
- Death roll prevention: Keep weight forward, steer smoothly, don't overcompensate
Sail Trim Fundamentals:
How to adjust sails for optimal performance:
- Tell-tale rule: Keep telltales streaming on both sides of sail
- Ease-until-luff: Let sail out until it starts to flap, then sheet in just enough to stop
- Upwind: Tight sheets, sails nearly on centerline
- Reaching: Moderate sheets, sails at 45-60° angle
- Downwind: Loose sheets, sails at 80-90° angle
- Gusts: Ease sheets slightly in strong gusts, sheet in as it passes
Boat Balance & Trim:
How to keep the boat flat and fast:
- Side-to-side: Hike out in strong winds, sit in middle in light winds
- Fore-and-aft: Crew forward in light winds, further back in strong winds
- Goal: Keep boat as flat as possible - heeling slows you down!
- Weight distribution: Both crew should move together smoothly
- Communication: Call out adjustments: "In!" or "Out!" to coordinate
4. Sailing in Company (Follow the Leader)
Assessment Criteria: Follow the Leader
- Control: Maintain between 1 and 2 boat lengths from the boat ahead
- Awareness: Know where the leader is at all times
- Spacing: Don't sail away from group, maintain formation
- Timely response: React promptly to leader's course changes
After launching, the candidate group will be asked to sail in company with a leader from the holding area to the sailing area.
Maintaining Boat Spacing
- Minimum spacing: 1 boat length behind leader (roughly 8-12 meters depending on boat)
- Maximum spacing: 2 boat lengths behind leader
- Finding the gap: Position yourself so you can see the boat ahead without straining
- Adjustments: Use sail trim and small course adjustments to maintain spacing
- Avoid: Don't overshoot the boat ahead if they slow, don't fall too far behind
Responding to Leader Changes
- Watch ahead: Anticipate the leader's moves before they happen
- Tacking: Tack when leader tacks, maintaining the gap
- Speed changes: Ease/sheet sail to match leader's speed changes
- Course changes: Follow smoothly, don't make jerky corrections
- Communication: Use hand signals to coordinate with other boats in formation
5. Sail a Triangle (Applying the Five Essentials)
Assessment Criteria: Sail a Triangle
- Flat boat: Use sheet control to keep boat reasonably flat at all times, especially in gusts
- Hiking: Helm hikes when appropriate; crew can trapeze if equipped
- Trim: Be aware of reducing drag - don't drag transom
- Sails setting: Set correctly for all points of sail (jib & main), don't over sheet
- Course made good: Sail close hauled upwind, use lay lines (don't sail beyond or further than required)
- Rudder: Do not use excessively - minimize rudder movement
- Centreboard: Set correctly for all points of sail
- Tacking: Close hauled to close hauled, maintain control (don't let go of sheet/tiller)
- Gybing: Broad reach to broad reach, maintain speed and control
The triangle exercise allows assessors to observe your continuous application of The Five Essentials throughout the sail.
Five Essentials in Action
- Course Made Good: Plan your course upwind to minimize distance, sail close hauled efficiently
- Sail Setting: Adjust sheets for each leg - tight upwind, ease on reaches, very loose downwind
- Boat Balance: Hike hard upwind to keep boat flat, adjust hiking on reaches/downwind
- Boat Trim: Crew forward in light winds, back in strong winds; adjust fore-and-aft balance
- Centreboard: Fully down upwind, progressively raise on reaches, three-quarters up downwind
6. Rudderless Sailing (Balance and Five Essentials)
Assessment Criteria: Rudderless Sailing
- Control: Avoid collisions at all times
- Upwind: Sail close to the wind but not necessarily close hauled
- Tacking: Tack successfully without tacking again or gybing (two exceptions allowed)
- Gybing: Do not round up past beam reach or allow main to flap excessively after gybe
- Helm position: Stay in appropriate sailing position (not standing upwind)
- Jib: Properly set throughout exercise
Without the rudder, you must balance the forces on the boat using weight distribution, sail trim, and the Five Essentials. This demonstrates true sailing skill and understanding of how boats work.
Sailing Without Rudder: Key Techniques
- Weight distribution: Move weight to control boat angle - forward/back for pitching, side-to-side for direction
- Sail balance: Use mainsail and jib to control heading - ease main and sheet in jib to turn downwind/gybe , sheet in main and ease jib to turn upwind/tack
- Hiking: Hike aggressively to keep boat flat and stable
- Sailing position: Stay on windward rail (hiking), not standing up
- Tacking technique: Time your weight movement to help the boat through tack - move quickly but smoothly
- Gybing control: Keep mainsheet under control, gybe smoothly from reach to reach
💡 Why Rudderless Sailing Matters: It proves you understand boat balance and can sail efficiently without relying on the rudder (which creates drag). This is the essence of good sailing technique.
7. Advanced Maneuvers
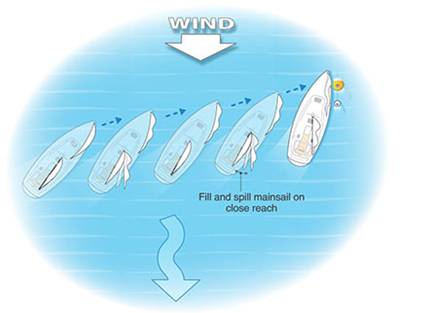
Coming Alongside (Fill & Spill Method)
Assessment Criteria: Coming Alongside
- Approach: Demonstrate speed control, appropriate approach angle relative to wind
- Stop: Stop alongside coach boat stern to stern, stay in control
- Contact: Make gentle contact with rib, don't collide heavily
- Leaving: Leave in a controlled manner
The "fill and spill" method uses sail trim to control speed as you approach the coach boat.
- Approach on close reach: Head toward the coach boat from slightly downwind
- Fill sails: Initially sheet in to maintain speed - "fill" means fully powered
- Spill wind: As you get close, ease sheets gradually - "spill" the wind to slow down
- Fine control: Use small sheet adjustments to control exact speed and stop position
- Position: Come alongside stern to stern (level with the coach boat)
- Contact: Make gentle contact, don't bounce or crash into rib
- Leaving: Lift centreboard, back the jib and/or push boom away from coach boat
⚠️ Key Points:
- Consider wind direction - approach leeward side if coach boat is not head-to-wind
- Control speed with sails, not rudder - maintain steerage without bouncing
- Hold onto rib gently when alongside
- Be ready to push away if things aren't going to plan
Picking Up a Mooring
Assessment Criteria: Picking Up a Mooring
- Approach: Demonstrate speed control, appropriate approach angle relative to wind
- Stop: Stop with buoy at windward shroud (so you can reach it easily)
- Tie on: Tie on with painter using proper knot (round turn & 2 half hitches)
- Settle: Remain on mooring until boat settles (centreboard up)
- Leaving: Leave in controlled manner, sail backwards away from mark if possible
Picking up a mooring demonstrates precise boat control and your ability to handle the rigging safely.
- Scout the mooring: Sail near it first to assess wind and tide effects
- Plan approach: Determine your approach angle relative to wind
- Prepare painter: Have it ready, coiled neatly, and accessible
- Approach: Come in on a close reach using fill & spill method
- Stop position: Stop with mooring buoy at your windward shroud (easy reach)
- Pick up: Crew reaches out and grabs buoy, passes through ring
- Tie on: Use round turn & two half hitches to secure painter - know this knot well!
- Settle: Lower centreboard partially, let boat settle head-to-wind
- Leaving: When ready, back the jib or push boom away, then sail backwards to clear mark
📌 Important: Know where and how to attach the painter. Check mooring setup before attempting pickup. Always have a clear escape plan.
Man Overboard (Simulated - Assessment Version)
Assessment Criteria: Simulated MOB Recovery
- Approach: Demonstrate speed control, appropriate approach angle
- Gybe: Do NOT gybe - always approach on tack (Quick Stop method only)
- Stop: Stop with MOB on windward shroud (can reach easily)
- Collect: Collect at windward shroud
- Stay in control: Do NOT tack when collecting the MOB
- Time: You have 3 minutes (allows for second attempt if needed)
For the assessment, you'll be recovering a simulated (heavy) dummy in a controlled exercise area.
- Shout alert: Acknowledge the MOB, point and keep visual contact
- Execute Quick Stop: Follow the Quick Stop method precisely
- Position: Stop with MOB at your windward shroud
- Speed control: Approach slowly - use fill & spill method
- Collection: Crew reaches out and grasps MOB, pulling them in
- No tacking: If you need to try again, don't tack - bear away and come around again
- Stay calm: The dummy is heavy - take your time, you have 3 minutes
⚠️ Safety Notes:
- Simulated MOB will be heavy when immersed - use your crew strength
- Don't rush - 3 minutes is plenty of time
- Be aware of other hazards in the exercise area (buoys, other boats)
- Your crew sits on centreboard case with arms folded - you do the work!
Tight Circles (Smooth Controlled Turns)
Assessment Criteria: Tight Circles
- Sheeting: Sails not over sheeted or flapping excessively
- Body movement: Balance to keep boat flat or lean away from safety boat (rib)
- Tiller use: Use reasonably fixed amount of rudder, don't fight it
- Smooth: No sharp corners in wake - smooth, flowing circles
- Radius: Stay within 1-2 boat lengths of the rib
- Hand changes: Expected after each tack and gybe
Sail smooth, tight circles around the safety boat, demonstrating efficient boat handling and sail control.
Technique:
- Use a fixed, moderate amount of tiller - don't constantly adjust
- Control speed with sails, not rudder - this creates smooth circles
- Balance weight to keep boat flat throughout circle
- Keep assessor (in rib) at center of your circle
- Tack and gybe as needed, hand changes expected
- Maintain consistent radius - don't spiral inward or outward
💡 Focus: Smooth, efficient turning demonstrates good sail handling and boat control. Avoid over-steering and jerky movements.
Man Overboard (MOB) Recovery Techniques:
Quick Stop Method
The approved ISA method for man overboard recovery - uses tacking only, never gybing.
- Shout "MAN OVERBOARD!" and keep pointing at the person
- Turn onto a beam reach away from the person (don't run them over!)
- Sail 5-10 boat lengths on beam reach
- Tack and sail back on opposite broad reach
- Approach on close reach with person on leeward side
- Ease sheets to slow and stop alongside person
- Pull person aboard from leeward side (boat tilts toward them)
Quick Stop MOB recovery sequence
Man overboard recovery demonstration. See Basic Skills - Man Overboard Recovery
📌 Key MOB Principles:
- Never lose sight of the person - designate a spotter to point
- Always approach on close reach from downwind
- Recover from leeward side (boat heels toward person)
- Practice in calm conditions before you need it in an emergency!
Sailing Backwards:
Useful for getting out of tight spots or correcting position.
- Back the jib: Push jib to windward side (wrong side)
- Hold tiller central: Keep rudder straight initially
- Boat moves backwards: Wind pushes bow away from jib
- Steer backwards: Push tiller toward direction you want stern to go
- To stop: Release jib, center tiller, sheet in mainsail
Pro tip: Steering in reverse is opposite to normal - push tiller toward where you want to go!
Sailing backwards demonstration with tiller movement shown
Heaving-To (Parking the Boat):
Technique to stop and rest while staying stable in position.
- Sail close-hauled on either tack
- Tack without releasing jib: Leave jib backed (on wrong side)
- Push tiller to leeward: Tie or hold tiller down
- Adjust mainsheet: Ease slightly until boat settles
- Result: Boat drifts slowly sideways and forward, almost stationary
Uses: Taking a break, reef sails, help another boat, wait for right of way, lunch stop!

See Basic Skills - Heaving-To for complete technique showing sail and rudder configuration
Coming Alongside a Pontoon:
How to approach and stop at a dock:
- Assess conditions: Check wind and tide direction
- Plan approach: Aim to come head-to-wind alongside pontoon
- Approach on close reach: Come in at controlled speed
- Turn head-to-wind: Point bow into wind to slow down
- Ease all sheets: Let sails flap completely
- Glide to stop: Use remaining momentum to reach pontoon
- Crew steps off: Front crew steps off with bow line first
- Secure: Tie bow and stern lines quickly
⚠️ Tip: It's better to come in too slow than too fast - you can always paddle the last bit!
8. Capsize Recovery
Assessment Criteria: Capsize Recovery
- Without assistance: Recover yourself without help from safety boat
- Don't turtle: Perform a wet capsize (don't hang off gunwale)
- Don't lose contact: Stay with the boat at all times
- Scoop method: Use the approved scoop recovery technique
⚠️ Important Assessment Notes:
- If you capsize during assessment - this is NOT a bad thing (everyone capsizes)
- Assessors expect to see wet capsize recovery, not turtling
- Perform recovery without assistance from safety boat
- Demonstrate competent, controlled technique
⚠️ Safety First!
- Stay with the boat - it's your life raft
- Check crew is safe and accounted for
- Don't panic - capsizes are normal and recoverable
- Be aware of cold water shock - control your breathing
Wet Capsize Recovery - The Scoop Method (Approved Technique):
WET CAPSIZE: Boat goes over, but you remain in the water. This is the correct method for assessment.
The official ISA method for capsize recovery. This technique allows the crew to be "scooped" back into the boat as it rights.
- Stay calm and check crew: Ensure everyone is safe and wearing buoyancy aids
- Check wind direction: Boat should be lying with mast downwind (if not, swim it around)
- One person to centreboard: Swim to back of boat and climb onto centreboard
- Crew stays in water: The crew remains in the water near the mainsail, holding the gunwale or jib sheet
- Helm rights the boat: Stand on centreboard edge, lean back using your weight
- Boat comes upright and scoops crew: As boat rights, the crew is scooped back into the boat
- Both aboard: Helm climbs in carefully, keeping weight low
- Bail water: Use bailer to remove water from boat
- Sail away: Get moving to warm up and stabilize boat
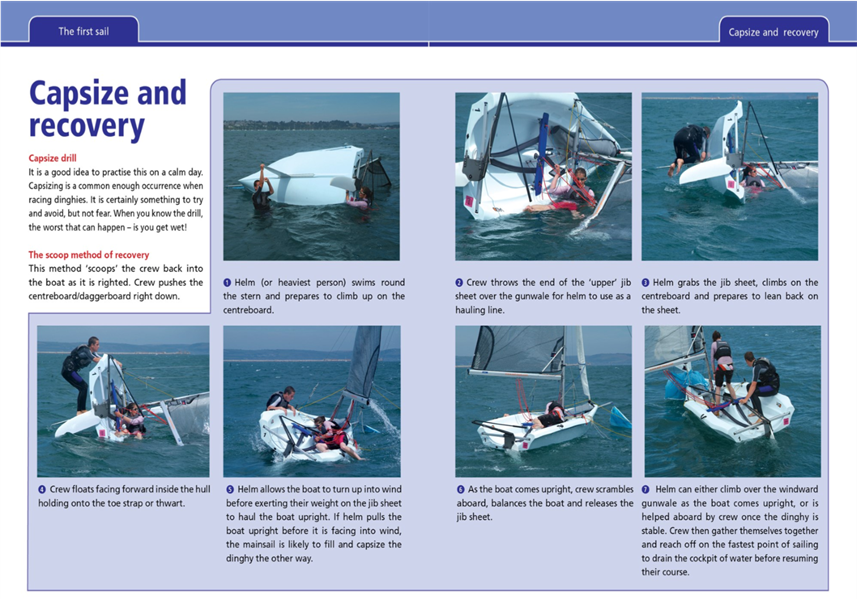
The Scoop Method in action. For detailed guidance, see Basic Skills - Capsize Recovery and Taste of Sailing - Capsize Recovery
What NOT to Do - Turtling (Hanging Off Gunwale):
❌ This is NOT acceptable for assessment and is dangerous:
- Turtling: Hanging off the gunwale while boat is upside down
- Why it's bad: Prevents sails from catching wind, weighs down boat structure
- Assessment: You will be marked down if you do this
- Safety: Can damage boat, makes recovery slower and harder
- What to do instead: Get on the centreboard immediately - use your weight to right the boat
Inversion Recovery (Turtle/Mast in Mud):
When boat is completely upside down with mast pointing straight down.
- Don't let it invert! Try to right boat before mast goes vertical
- If fully inverted: Climb onto hull bottom
- Find centreboard: Look for centreboard slot under boat
- Pull centreboard out: Yank centreboard out as far as it will go
- Rock the boat: Jump/bounce on hull to break suction of mast in water
- Stand on centreboard: As boat rolls to side, get on centreboard
- Complete as normal: Lean back to bring boat upright
- Bail lots of water: Inverted boats fill with water
⚠️ Warning: Inversion is exhausting and dangerous. Prevent it by acting fast during initial capsize!
Self-Rescue (Separated from Boat):
If you become separated from your boat:
- Don't panic: You're wearing a buoyancy aid - you will float
- Swim efficiently: Use front crawl or breaststroke toward boat
- Grab any line: Grab trailing sheets, painter, or any rope first
- Pull yourself along: Hand-over-hand to reach hull
- Get to centreboard: Swim to back of boat
- Climb on centreboard: Use it to pull yourself up
- Right the boat: Follow normal capsize recovery procedure
Cold Water Safety:
Understanding Cold Water Shock (1-1-10 Rule):
- 1 minute: Initial cold shock - gasping reflex, rapid breathing
- 10 minutes: You have ~10 minutes of useful movement before cold incapacitation
- 1 hour: Approximate time before unconsciousness from hypothermia
What to Do:
- Control breathing: Fight the gasping reflex, breathe slowly
- Float first: Don't swim immediately - wait for breathing to normalize (30-60 seconds)
- Stay with boat: Get out of water as quickly as possible
- Minimize movement in water: Reduces heat loss
- Huddle together: If multiple people in water
- Dress appropriately: Wetsuit or drysuit in cold water (below 15°C)
📌 Practice Makes Perfect!
Capsize recovery should be practiced regularly in safe, supervised conditions. The more you practice, the less stressful a real capsize will be. Many sailing schools offer capsize recovery practice sessions - take advantage of them!
Knowledge Requirements
You'll be questioned on your understanding of:
Jump to a knowledge area:
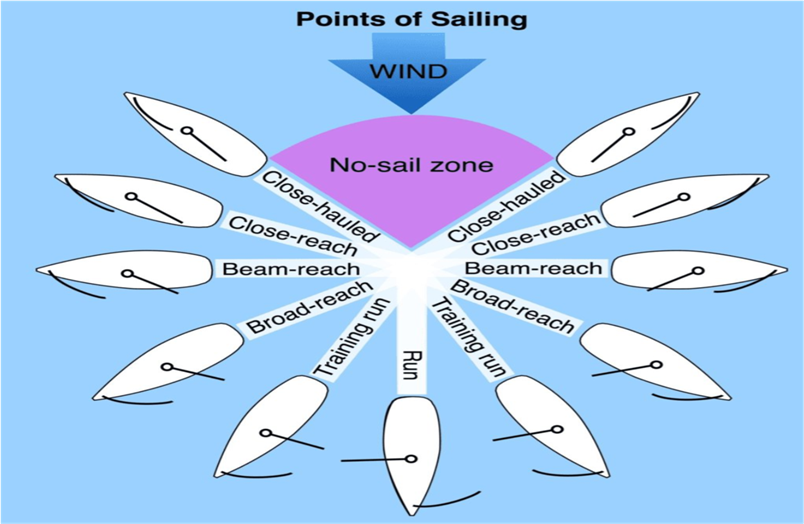
1. Points of Sailing
- Identify and explain all points of sail
- Describe no-go zones and wind shadows
- Explain how sails work (aerodynamics basics)
Understanding sail aerodynamics
How Sails Work - The Science:
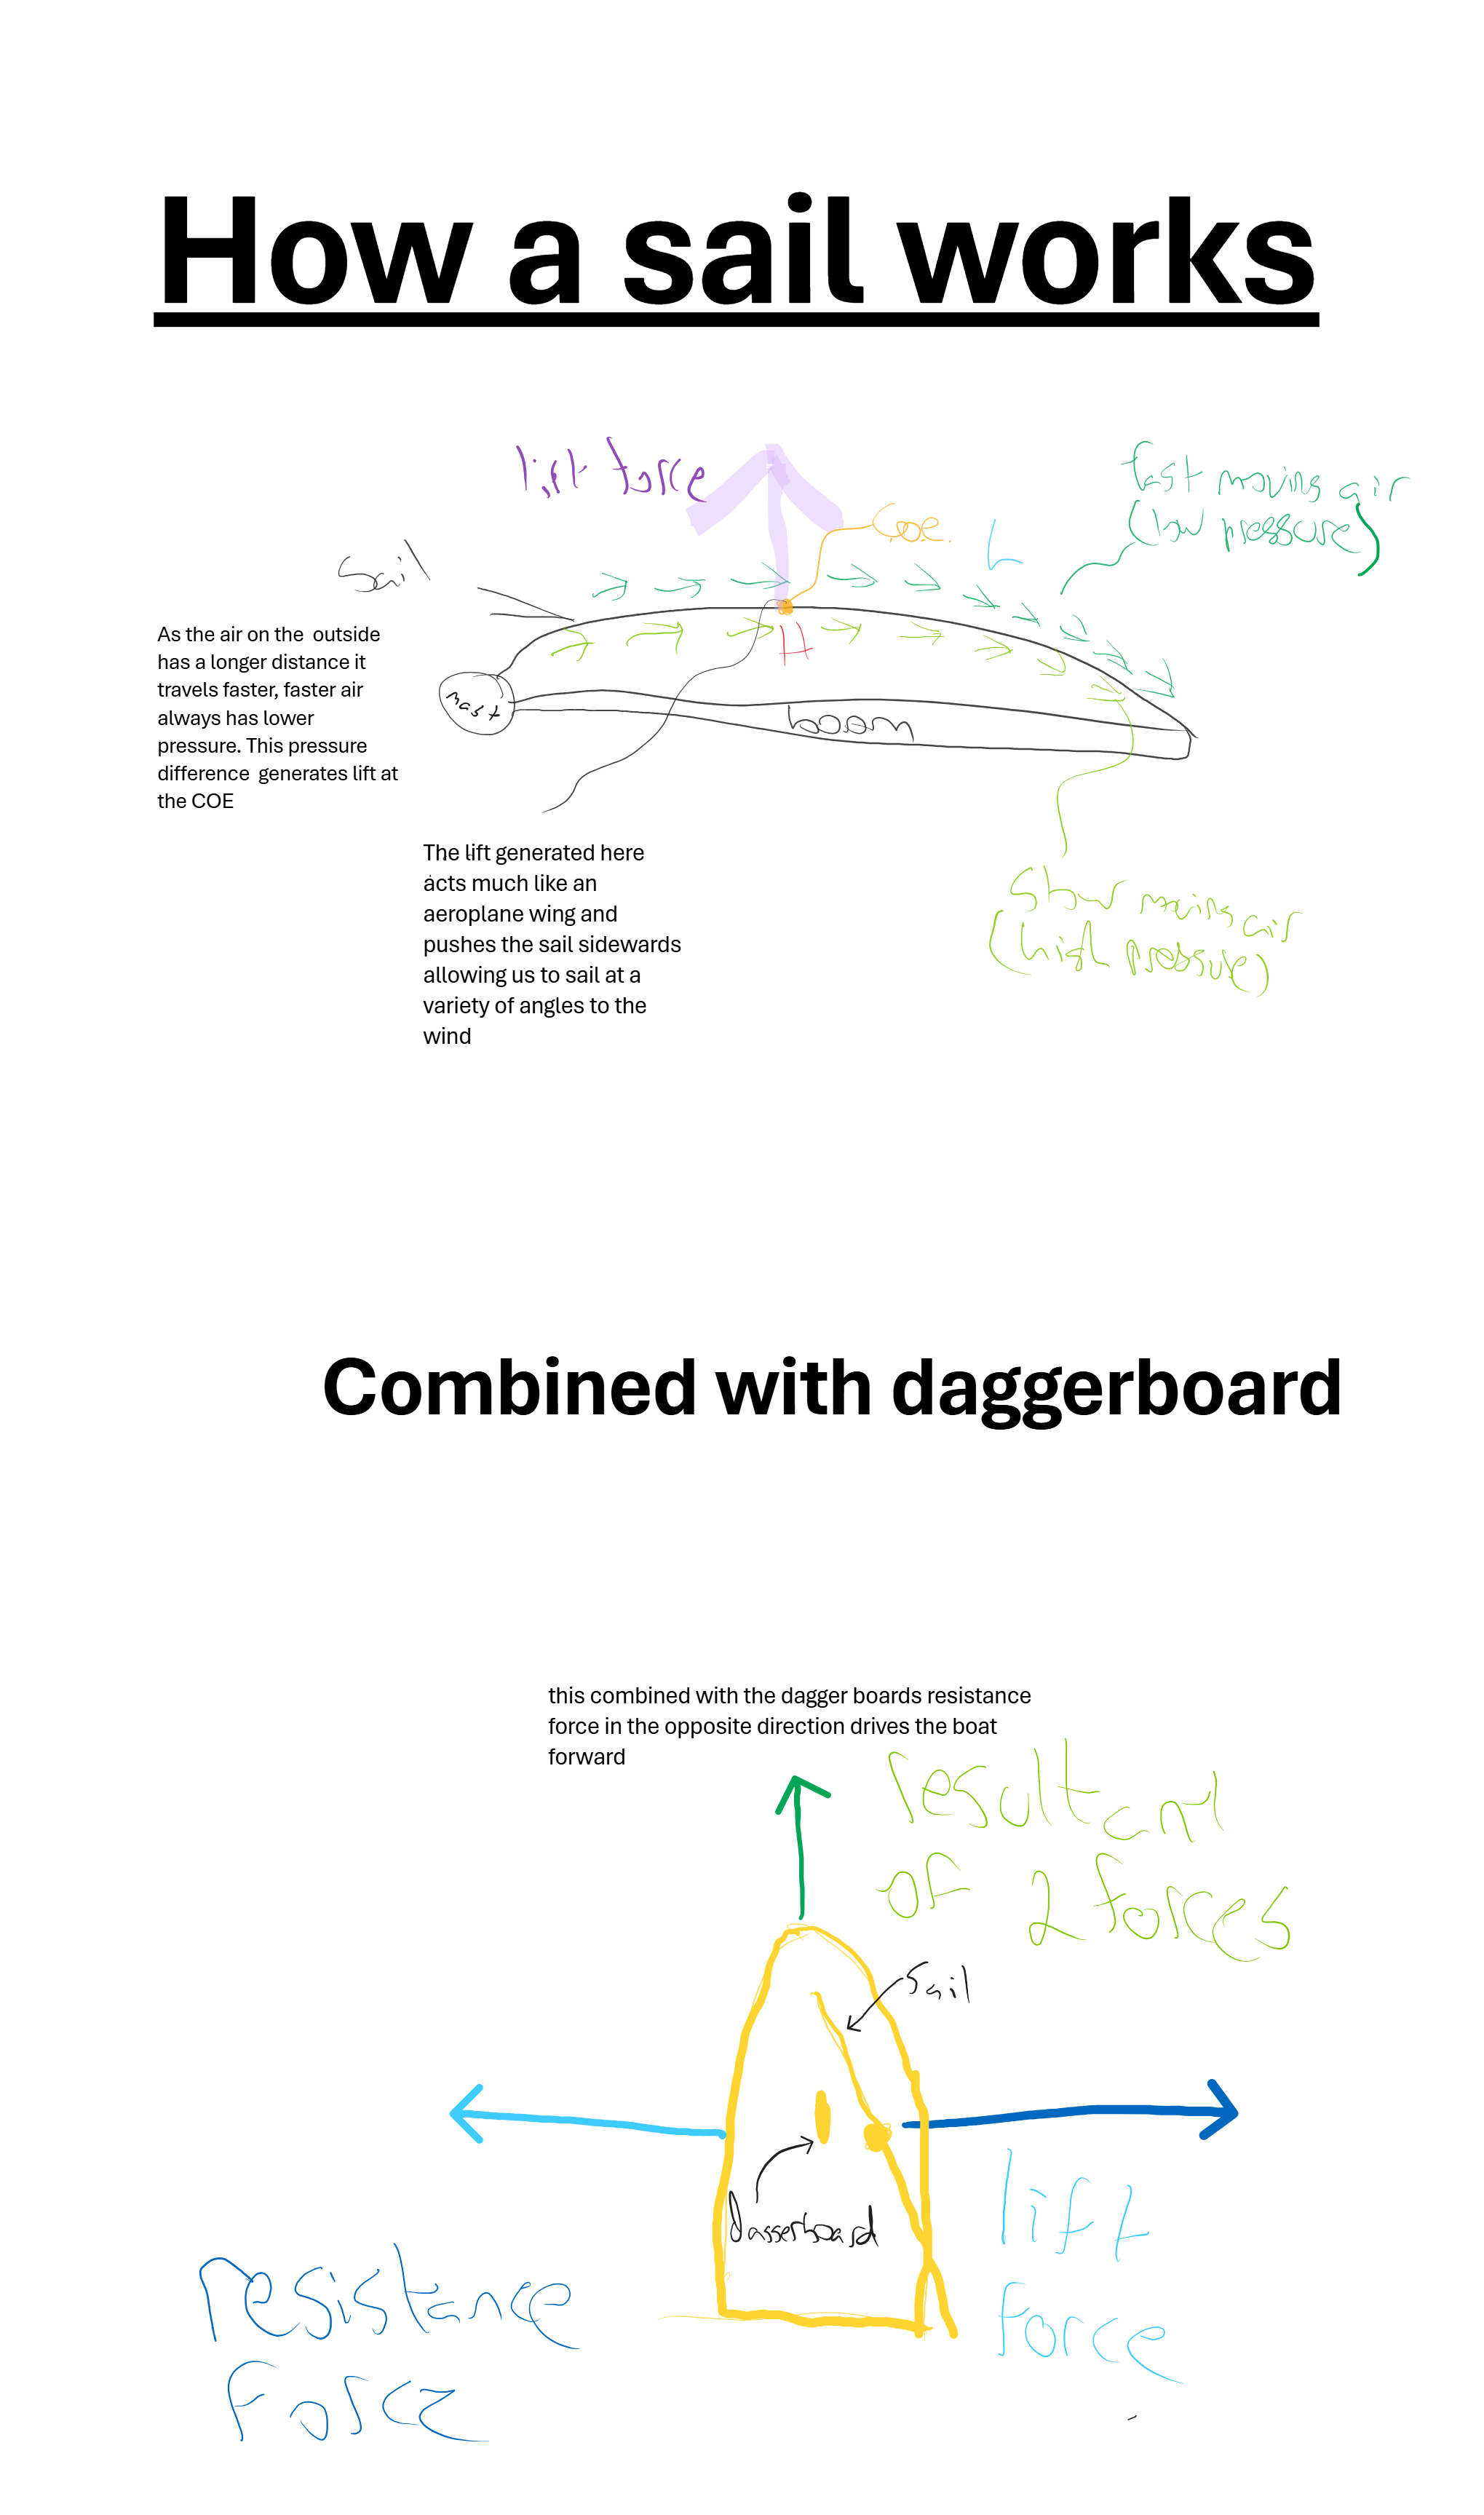
Like an airplane wing, a sail primarily creates lift (a pulling force) rather than just being pushed by the wind:
- Lift Generation: Wind flowing over the curved sail surface creates higher pressure on one side and lower pressure on the other
- Pressure Difference: This pressure difference generates a powerful lifting force that pulls the boat forward
- Not Just Push: The boat is pulled by the sail, not just pushed from behind (except when running directly downwind)
- Centreboard/Daggerboard: Resists sideways force, converting the sail's lift into forward motion
Video: How sailing works - aerodynamics explained. See also Basic Skills - Sailing Knowledge
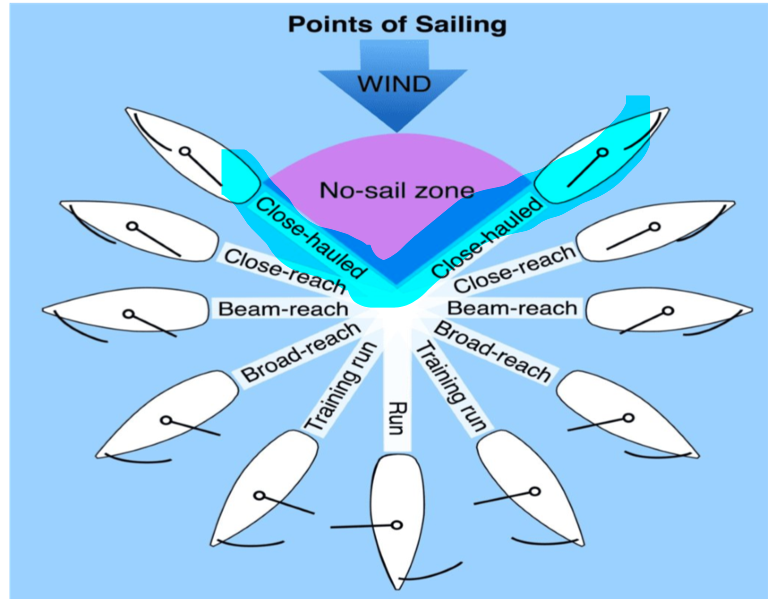
For more detail, see Start Sailing - Points of Sailing
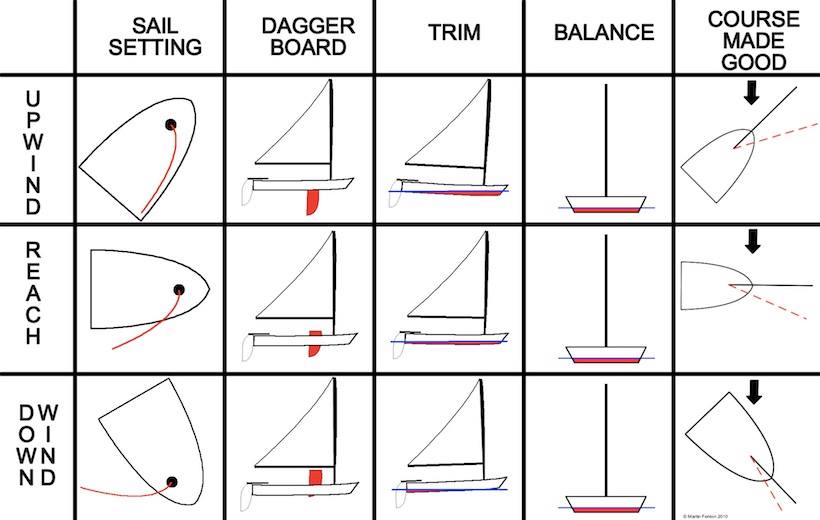
2. The Five Essentials
You must understand and be able to explain The Five Essentials - the fundamental principles of good sailing:
- Course Made Good: Sailing the best course toward your destination, accounting for wind shifts and tide
- Sail Setting: Trimming sails correctly for the point of sail and conditions
- Boat Balance (Heeling): Keeping the boat as flat as possible for maximum speed
- Boat Trim (Fore & Aft): Distributing weight correctly along the boat's length
- Centreboard Position: Adjusting centreboard depth for different points of sail
Why it matters: The Five Essentials work together. If one is wrong, the boat won't perform well. Assessors will expect you to apply these principles constantly while sailing.
See Basic Skills and Improving Skills for application of The Five Essentials
3. Safety & Rules
- Safety Equipment: List essential safety gear and its purpose
- IRPCS Basics: Understand basic collision regulations (port/starboard, windward/leeward, overtaking) - see Basic Skills - Collision Avoidance and Start Sailing - Rules of the Road
- Beaufort Scale: Describe wind strengths and their effects on sailing - see Basic Skills - Beaufort Scale
- Weather Awareness: Identify weather conditions suitable for sailing and recognize danger signs
- Beaufort Scale: Describe wind strengths and their effects on sailing
- Cold Water Shock: Explain risks and prevention
- Lee Shore Dangers: Explain why a lee shore (wind blowing toward shore) is dangerous and how to avoid it
- Tidal Awareness: Understand how tides affect sailing, particularly near shore and in channels
Lee Shore - Critical Safety Concept:
A lee shore is when the wind is blowing toward the shore. This is dangerous because:
- If you have problems (capsize, equipment failure), the wind pushes you onto the shore
- Waves build up as they approach shallow water near shore
- Difficult or impossible to sail away from shore in onshore winds
- Risk of boat damage and personal injury on rocks, beaches, or structures
How to avoid: Stay well clear of lee shores. If you must sail near one, have a clear escape plan and don't venture too close.
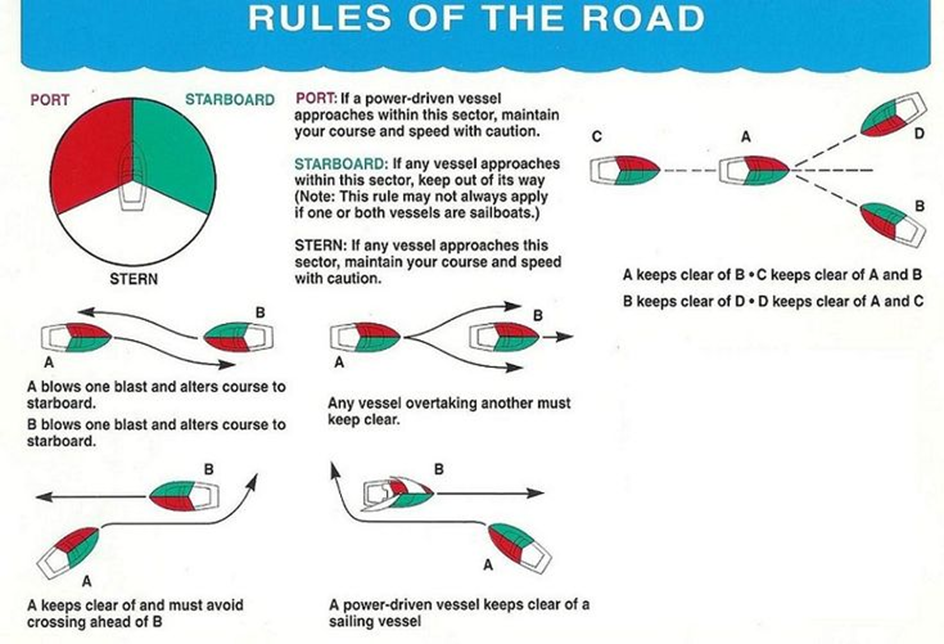
Collision avoidance rules for sailors
Key Collision Avoidance Rules:
- Risk of Collision: If another vessel's bearing remains constant while distance decreases, collision risk exists
- Motorboat vs Sailboat: Power-driven vessels must give way to sailing vessels (with exceptions for large vessels in restricted waters)
- Two Sailboats - Same Tack: Leeward boat (downwind) has right of way; windward boat (upwind) must keep clear
- Two Sailboats - Opposite Tacks: Port tack boat must give way to starboard tack boat
- Overtaking: Any vessel overtaking another is the give-way vessel, regardless of type
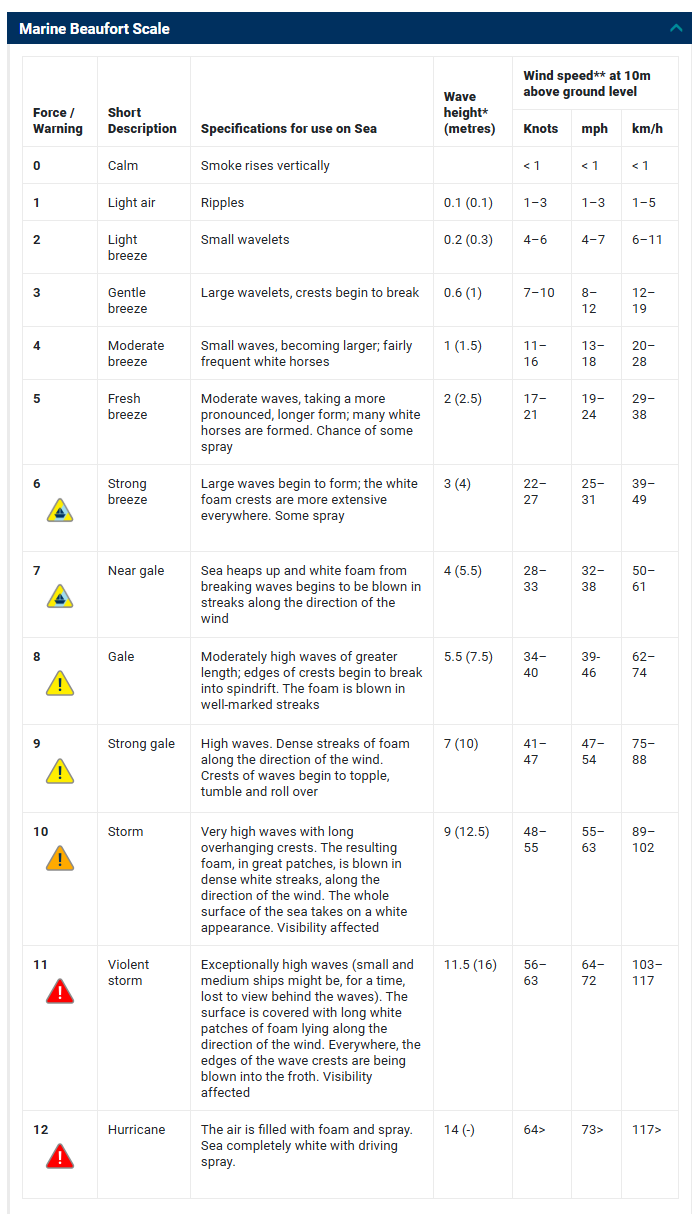
Beaufort Scale - Understanding wind strength and its effects. See Basic Skills - Weather section for detailed explanation
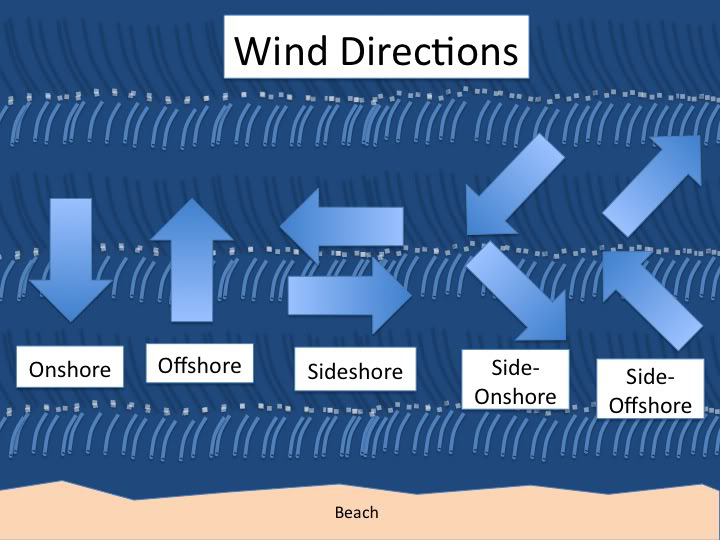
Wind Direction Effects:
- Onshore Winds: Blow toward land from water - provide a 'safety net' pushing you toward shore, but create choppy conditions near coast and make landing challenging
- Offshore Winds: Blow away from land toward open water - DANGEROUS as they push you further offshore if you lose control, but create flatter water near shore
- Cross-shore Winds: Blow parallel to shore - generally good for sailing along coastline
4. Boat Terminology & Hull Design Theory
Hull Shape & Buoyancy
- Displacement: The volume and weight of water displaced by the boat, which equals the boat's weight at equilibrium
- Buoyancy: The upward force from displaced water, equal to the boat's weight when floating
- Center of Buoyancy: The center point of the displaced water volume
- Center of Gravity: The center point of the boat's total weight
- Stability: A boat is stable when center of gravity is below center of buoyancy
- Freeboard: The height of the hull above the waterline
Lateral Resistance
- Underwater Profile: The shape of the hull below the waterline resists sideways movement (leeway)
- Centreboard/Daggerboard: Increases lateral resistance for better pointing ability when sailing upwind
- Rudder: Provides steering control by redirecting water flow
- Draft: The depth of the boat below the waterline - deeper draft = better upwind performance but limits shallow water sailing
Righting Moment & Heel
- Heeling: When wind force pushes the boat sideways, causing it to tilt
- Righting Moment: The boat's tendency to return to upright through weight distribution
- Narrow boats: Have less righting moment, capsize more easily
- Wider boats: Have more righting moment, capsize resistance improved by crew weight on rail
5. Wind & Weather Theory
Wind Patterns & Effects
- True Wind: The actual wind direction and speed relative to the ground/water
- Apparent Wind: The wind you feel when moving - combination of true wind and your boat's motion
- Wind Gradient: Wind speed increases with height above water surface
- Wind Shear: Different wind speeds at different heights - affects sails and control
- Lulls & Gusts: Temporary variations in wind speed - require constant sail trim adjustment
- Wind Direction Changes: Shifts and oscillations require tacking strategy adjustments
Weather Systems & Visibility
- Pressure systems: High pressure = calm/stable conditions; Low pressure = unstable/stormy
- Fronts: Rapid changes in weather as air masses move
- Visibility: Measured in meters/nautical miles; affects safety and navigation
- Fog: Severely limits visibility; requires heightened awareness and navigation skill
- Sea State: Wave height and period determine water conditions and handling difficulty
Temperature & Water Conditions
- Water Temperature: Critical for safety - cold water shock is a real hazard
- Thermoclines: Layers of different temperatures in water affect buoyancy
- Currents: Horizontal water movement from tides and rivers affects boat track
- Waves: Generated by wind; size and period affect sailing conditions significantly
6. Sail Theory & Aerodynamics (Deeper Understanding)
Sail Shape & Performance
- Luff: Leading edge of sail, must curve smoothly for efficient airflow
- Leech: Trailing edge of sail, controls flow separation and power
- Draft: The depth of curve in the sail; deeper = more power, flatter = better pointing
- Draft Position: Forward position = more stable/forgiving; aft position = more power/control
- Twist: The sail twists more toward the top; essential for even power distribution
- Leech Telltales: Flow indicators showing if sail is stalled or flowing efficiently
Airflow Over Sails
- Leeward Side: Lower pressure = suction force pulling boat forward (primary lift source)
- Windward Side: Higher pressure = pushing force (secondary)
- Flow Separation: When flow stalls and detaches from sail = poor performance (indicated by luffing)
- Stall: Excessive angle of attack causes flow to break away; indicated by telltales dropping
- Jib Backwinding: When jib airflow hits mainsail, reducing efficiency - indicated by main not setting properly
Interaction Between Sails
- Slot Effect: Gap between jib and main creates accelerated airflow = increased performance
- Optimal Spacing: Too close = backwinding; too far = poor interaction
- Jib Lead: Position affects how efficiently jib feeds air to mainsail
- Main Trim: Affects how jib performs - tight main creates backwind pressure on jib
7. Compass Navigation Theory
Compass Basics
- Magnetic North: Direction compass needle points; differs from True North
- True North: Geographic north pole; used on charts
- Compass Card: 360° divided into 32 points or cardinal/intercardinal directions
- Bearing: Direction from one point to another, measured in degrees (0-360°)
- Course: Direction the boat is sailing, measured from True North
Variation & Deviation
- Variation: Difference between True North and Magnetic North - varies by location and year
- Deviation: Difference between Magnetic North and Compass North - caused by boat's metal affecting compass
- Variation & Deviation East: Subtract from compass bearing to get true bearing
- Variation & Deviation West: Add to compass bearing to get true bearing
- Compass Card: Card in compass showing deviation for different headings
Plotting Courses & Bearings
- Steer From Chart: Identify destination, plot course on chart using parallel ruler/plotter
- Convert to Compass: Apply variation and deviation to get magnetic course to steer
- Plot Magnetic Bearing: Given two points on chart, determine magnetic bearing between them
- Fix Position: Take bearings to three known landmarks, plot on chart to fix boat position
- Three-Point Fix: Most accurate method - three bearings to distant landmarks provide position
8. Chart Symbols & Navigation Marks
Chart Features & Symbols
- Latitude & Longitude: Coordinates for any position on earth - latitude horizontal lines, longitude vertical
- Depth Contours: Lines of equal depth; critical for grounding prevention
- Drying Areas: Shallow areas that dry out at low water - marked with stippling
- Underwater Hazards: Rocks, wrecks, obstructions marked with symbols and coordinates
- Land Features: Churches, lighthouses, conspicuous landmarks used for navigation
- Anchor Areas: Designated areas where boats may anchor safely
Tidal & Directional Marks
- Tidal Diamonds: Lettered marks showing tidal stream direction and rate by hour
- North Arrow: Shows magnetic north direction on chart
- Compass Rose: Reference circles for plotting courses and bearings
- Variation Information: Annual change in variation shown on compass rose
Navigation Buoy & Mark Types (IALA System)
- Port Lateral Marks: Red, left side when entering harbor - pass to port (left)
- Starboard Lateral Marks: Green, right side when entering harbor - pass to starboard (right)
- Cardinal Marks: Black & yellow buoys indicating direction to safe water from hazard
- North Cardinal: Black & yellow top - hazard to south, safe water to north
- South Cardinal: Yellow & black top - hazard to north, safe water to south
- East Cardinal: Black & yellow & black top - hazard to west, safe water to east
- West Cardinal: Yellow & black & yellow top - hazard to east, safe water to west
- Isolated Danger Marks: Black & red horizontal stripes - hazard (rock, wreck) in middle, safe water around
- Safe-Water Marks: White with red band - center of navigable channel, safe in all directions
- Special Marks: Yellow buoys indicating pipeline, cable, or other special feature - not for navigation
9. Sail & Mast Controls Theory
Mainsail Controls & Functions
- Main Halyard: Hoists mainsail up the mast - tension affects luff shape and draft position
- Cunningham (Luff Tension): Downhaul on mainsail luff - controls horizontal sail shape and draft position
- Outhaul: Tensions foot of mainsail - flattens sail in strong wind, eases in light wind for power
- Vang/Kicker: Downhaul on boom - prevents twist and boom lifting, maintains consistent sail shape
- Main-sheet: Controls mainsail angle and twist - primary power control for mainsail
- Traveller Telltales: Cloth strips showing airflow over mainsail; indicates proper trim
- Battens: Horizontal stiffeners in sail; affect sail shape and power delivery
Jib Controls & Functions
- Jib Halyard: Hoists jib up the forestay - must be tight to prevent sagging
- Jib Sheets & Sheeting Angles: Jib has separate port and starboard sheets for control
- Jib Sheet Angle: Forward fairlead = tighter lower jib for upwind; aft fairlead = full upper jib for reaching
- Telltales: Cloth strips on jib showing proper trim - both sides should stream equally
- Jib Leads (Fairleads): Position of sheet block affects sail shape - critical for trim
- Jib Sheeting Angles: Typically 12-15° from centerline for optimal performance
Mast Controls & Functions
- Mast Rig Tension (Shrouds): Side stay tension controlling mast bend sideways
- Forestay Tension: Controls mast rake and fore-aft bend - affects sail shape significantly
- Spreader Length & Angles: Determine effective shroud length and lateral support pattern
- Spreader Angle: Typically 45° for optimal support - affects shroud loading
- Mast Ram (Aft Butt Control): Controls position of mast step - affects mast rake and performance
- Chocks: Support blocks under mast preventing side-to-side movement
- Rake: Backward angle of mast from vertical - affects balance, pointing, and sail shape
- Mast Bend: Fore-aft curve in mast controlled by shroud/forestay tension - flattens sail
10. Boat Systems & Rigging
- Explain how each control (mainsheet, jib sheet, kicker, outhaul, cunningham, etc.) affects sail shape and boat performance
- Identify when and why to adjust each control
- Understand basic sail trim principles for different conditions
Blocks & Tackle (Mechanical Advantage)
- Single Block: 1:1 mechanical advantage - just changes direction
- Double Block: 2:1 advantage - requires twice the purchase but half the force
- Mechanical Advantage: Lower ratio = easier control but less power; higher ratio = more power but harder to haul
- Jam Cleats: Must be angled correctly to grip rope without slipping
Mast & Boom Systems
- Mast Bend: Controlled by shroud tension and forestay; affects sail shape
- Boom Angle: Affects how sail fills and twists
- Boom Vang/Kicker: Prevents boom from rising, maintains sail shape
- Forestay Tension: Controls mast bend and sail draft position
Centerboard/Rudder Systems
- Pivot Point: Where centerboard rotates; affects lift and drag characteristics
- Foil Section: The shape of centerboard/rudder blade as airfoil in water
- Angle of Attack: The angle relative to water flow; too much creates stall and drag
- Heel Effect: Boat heel changes effective angle of attack of rudder
8. Navigation & Tides Theory
Tide Mechanics
- Spring Tides: Largest tidal range; occur at new and full moon when sun and moon align
- Neap Tides: Smallest tidal range; occur at half moon when sun and moon pull at right angles
- Tidal Stream: Current created by tide; speed varies throughout tidal cycle
- Slack Water: Period of little or no tidal current, typically around high/low water
- Rate of Tide: Speed of water movement; strongest at mid-tide, weakest at slack
- Set and Drift: Direction and speed of tidal current effect on boat track
Reading Tidal Information
- Tide Tables: Show high/low water times and heights for reference ports
- Secondary Ports: Corrections applied to reference port predictions
- Tidal Diamonds: Chart symbols showing tidal stream direction and rate by hour
- Depth Contours: Show available water depth at high and low tide
- Holding Ground: Type of seabed affects anchor holding - sand/mud = good, rock/weed = poor
Navigation Marks & Buoys
- Red/Green Buoys: Cardinal marks for port (red) and starboard (green) sides when entering
- IALA System: International marking system for buoys and lights
- Light Characteristics: Different flashing patterns identify specific marks at night
- Isolated Danger Marks: Black and red buoys marking rocks, wrecks, etc.
- Safe Water Marks: White with red band indicating safe deep water
9. Rules of the Road (IRPCS) - Theory
Key Principles
- Duty to Avoid Collision: All vessels must take action to prevent collision
- Good Seamanship: Every vessel must proceed at safe speed
- Crossing Situation: Vessel on starboard side has right of way (Stand-on vessel)
- Head-on Situation: Both vessels must alter course to starboard
- Overtaking: Overtaking vessel must always keep clear regardless of other circumstances
Risk of Collision Assessment
- Constant Bearing: If bearing to another vessel stays the same while distance decreases, collision risk exists
- Point on Horizon: Vessel appears to stay in same spot but getting closer = risk exists
- Doubt = Risk: If uncertain whether collision risk exists, treat as if it does
- Early Action: Alter course early with obvious maneuver to show intention
- Crossing Range: Closest Point of Approach (CPA) determines if vessel will pass in front or behind
Sound Signals & Lights
- One Blast: I am altering course to starboard
- Two Blasts: I am altering course to port
- Three Blasts: I am operating in reverse
- Five Blasts: Warning signal - I don't understand your intentions
- Light Signals: At night, flashing lights convey same meanings as sound signals
10. Safety Theory & Equipment
Personal Flotation Devices (PFDs)
- Buoyancy Rating: Measured in Newtons; minimum 50N for dinghy sailing
- Fit & Adjustment: Must fit snugly to be effective - lift arms to check fit
- Types: Foam-filled for continuous protection; inflatable for comfort with instant deployment
- Always Wear: Non-negotiable safety requirement - even in harbor
- Inspection: Check for damage, proper functioning of closures and zippers
Emergency Equipment
- Flares: Red handheld, orange smoke, or parachute types - signals distress
- Life Raft: Lifeboat container for survival at sea
- First Aid Kit: Essential for treatment of injuries
- Sea Anchors: Drogue deployed to slow drift in emergency
- Safety Line: Tether connecting crew to boat when on deck in severe conditions
- Bailer/Pump: For removing water from boat quickly
Cold Water & Hypothermia
- Cold Water Shock: Occurs in first 1-3 minutes; gasping and inability to control breathing
- Useful Movement: ~10 minutes before cold incapacitation begins
- Immersion Hypothermia: Core body temperature drops; can occur rapidly in cold water
- Prevention: Wear wetsuits in water below 15°C, drysuits below 10°C
- Survival Position: HELP (Heat Escape Lessening Posture) reduces heat loss if alone
- Huddle Position: Multiple people in water group together for shared warmth
11. Rope & Seamanship Theory
Rope Materials & Properties
- Natural Fibers: Sisal, manila - good grip, rots if wet, less strength than synthetic
- Synthetic Fibers: Polypropylene (floats), nylon (stretchy, high strength), polyester (Dacron) - preferred for sailing
- Rope Strength: Breaking strain decreases with age, damage, knots, and UV exposure
- Stretch: Elastic ropes absorb shock; non-stretch rope better for sheet control
- Diameter: Thicker rope = more strength and grip but less handling ease
Knot Selection Criteria
- Strength Retention: Different knots retain 40-80% of rope strength
- Ease of Untying: Under load some knots jam; others won't hold
- Load Type: Fixed load vs variable load requires different knots
- Rope Material: Smooth rope (polypropylene) needs different knots than rough rope
- Purpose: Temporary vs permanent attachment; single vs double rope
Rope Care & Maintenance
- Storage: Keep dry and coiled properly; avoid tight kinks and extreme bends
- Whipping: Binding the end prevents fraying and unraveling
- Inspection: Check for cuts, abrasion, discoloration, softness indicating damage
- Splicing: Permanent joining of ropes - stronger than knots but requires skill
- Replacement: Severely damaged rope should be retired for safety
12. Capsize & Recovery Theory
Capsize Mechanics
- Righting Moment Loss: When heeling reaches critical angle, boat inverts
- Cause: Usually excessive heel from wind gust + crew weight not hiking effectively
- Prevention: Proper sail trim, crew weight management, and quick sheet easing in gusts
- Tumble: Progressive heel into capsize - boat flips sideways
- Inversion: Complete flip upside down - only if recovery not attempted quickly
Righting Technique Physics
- Center of Buoyancy Shift: When boat heels, buoyancy shifts sideways creating righting moment
- Weight on Centreboard: Crew weight on centerboard increases leverage for righting
- Mechanical Advantage: Longer centreboard = greater mechanical advantage for righting
- Crew Position: Standing on centerboard edge maximizes recovery leverage
- Boat Trim: Keeping weight forward helps boat come upright smoothly
Recovery Psychology & Safety
- Initial Panic: Must control breathing and stay calm - boat is unsinkable with buoyancy
- Communication: Crew must coordinate to avoid doing opposite things
- Multiple Attempts: If first attempt fails, analyze and try different technique
- Assistance: If unable to self-rescue, safety boat will assist
- Post-Capsize: After righting, must bail water and assess damage before sailing on
13. Boat Systems & Rigging (Continued)
- Explain how each control (mainsheet, jib sheet, kicker, outhaul, cunningham, etc.) affects sail shape and boat performance
- Identify when and why to adjust each control
- Understand basic sail trim principles for different conditions
14. Navigation & Tides (Basic)
- Understand tidal patterns and their effect on sailing
- Explain how to use local tide tables
- Basic awareness of navigation marks and harbor rules
Teaching Practice
While Pre-Entry focuses on personal sailing skills, you may be asked to:
- Explain a technique or maneuver clearly
- Demonstrate coaching points for a specific skill
- Show awareness of how to break down skills into teachable steps
This is not a full teaching assessment, but shows your readiness to begin learning how to instruct.
Assessment Process
Format
- Duration: Typically 2-3 hours on the water
- Conditions: Assessed in a variety of wind and weather conditions (usually Force 2-4)
- Assessment Style: One-on-one or small group with an assessor
What the Assessor Looks For
- Confidence: You should sail with assurance and control
- Safety Awareness: Always prioritize safety for yourself and others
- Technical Proficiency: Demonstrate smooth, efficient technique
- Decision Making: Make good tactical and safety decisions
- Communication: Explain your actions and knowledge clearly
- Attitude: Show enthusiasm, professionalism, and a willingness to learn
Pass Criteria
To pass Pre-Entry, you must demonstrate:
- Competent and safe boat handling in moderate conditions
- Sound knowledge of sailing principles and safety
- Ability to rig, launch, sail, and recover independently
- Readiness to begin instructor training
Tips for Success
Before Your Assessment
- Practice Regularly: Sail as much as possible in different conditions
- Work on Weaknesses: Identify skills you're less confident with and practice them deliberately
- Sail Different Boats: Experience with various dinghy types helps develop versatile skills
- Study Theory: Review basic sailing knowledge, rules, and safety procedures
- Watch Experienced Sailors: Observe instructors and advanced sailors to learn efficient techniques
- Get Feedback: Ask instructors or experienced sailors to watch you and provide constructive feedback
During Your Assessment
- Stay Calm: Nerves are normal, but try to relax and sail as you normally would
- Communicate: Talk through what you're doing and why—this shows understanding
- Be Safe: If conditions feel unsafe or beyond your ability, speak up
- Ask Questions: If you don't understand something, ask for clarification
- Show Your Best: This is your opportunity to demonstrate everything you've learned
- Be Honest: If you make a mistake, acknowledge it and show how you'd correct it
Common Mistakes to Avoid
- Rushing through rigging and safety checks
- Poor communication with the assessor
- Overconfidence leading to risky decisions
- Neglecting basic skills like tying knots correctly
- Poor sail trim and boat balance
- Hesitation or indecision when maneuvering
After Pre-Entry
Once you've successfully completed Pre-Entry, you're ready to begin your instructor training journey:
- Instructor Course: Learn fundamental teaching skills and techniques
- Advanced Instructor Course: Learn how to teach SBSS advanced courses
- Senior Instructor: Leadership, assessment, and program development
Each level builds on the previous one, developing your skills as both a sailor and an educator.
Pre-Entry Knowledge Quiz
Test yourself on the key concepts and applications from this page. Aim for a strong score before your assessment.
Official Assessment Papers & Resources
Below are the official Irish Sailing Association (ISA) Pre-Entry assessment papers and practical preparation guides. These documents contain the exact requirements and standards you'll be assessed against.
ISA Dinghy Pre-Entry Paper 1
Official assessment paper covering personal sailing skills and boat handling requirements.
ISA Dinghy Pre-Entry Paper 2
Knowledge requirements, sailing theory, and safety procedures assessment criteria.
ISA Dinghy Pre-Entry Paper 3
Additional assessment criteria and performance standards.
SBSS Pre-Entry Practical Trainee Preparation Guide
Comprehensive practical preparation guide to help you prepare for the hands-on assessment.
SBSS Pre-Entry 2025
Latest Pre-Entry guidelines and requirements for 2025.
📌 Important: These are the official assessment documents from Irish Sailing. Review them thoroughly before your assessment to understand exactly what will be expected of you.
Ready to Take the Next Step?
If you're considering Pre-Entry, make sure you have:
- Significant sailing experience beyond Improving Skills
- Confidence in moderate wind conditions
- A solid understanding of sailing theory and safety
- The ability to work independently on the water
Contact your local sailing school or Irish Sailing for information on Pre-Entry assessment dates and requirements.